This is to anyone who is stepping into the software testing ground. Good testing can be difficult. But there are some ways to make your testing easier and more effective. Maybe that’s why there’s not much difference in the salary of a developer and a tester. I’m going to go through and review some of the tools that I use to level up my browser testing, and hopefully it can help you level up as well!
PerfectPixel
Use Case: Validation of a website against a predetermined mock up.
This is a simple Chrome extension that will help you verify the pixel perfection of a web page against the design file. Once you install the extension, click on the Perfect Pixel icon on the right navbar of the browser, and it opens the drop zone for an image. Just drag and drop your design file or mockup, and the mockup will appear above your webpage with an opacity (you have the ability to adjust the opacity).

This is extremely beneficial to me because it allows me to see how accurately the website under test is designed. Once you set up the mockup, you can clearly identify whether the website layout is as per the design or not.
This tool has not only helped me with verifications but also helped me create pixel-perfect websites. While you have the mockup against the website or web page, you can make adjustments to the web element stylings in order to match the mockup design. It’s much easier as you do the source changes while having the mockup.
A drawback of this is that it is only validating it in Chrome, so it won’t capture cross browser/device issues. Also, you are good to use this tool only when you’re provided with a design mockup. This tool is not essential for projects that focus more on the functionality perspective than design.
WhatFont
Use Case: Validating font related basic information on a web page.
Whatfont is another Chrome extension that helps you verify the font name, size, and style. You can easily compare the font-related details against the design mockup using Whatfont.
Once the extension is installed, clicking on the Whatfont icon on the right navbar in Chrome will present you with a cursor that enables you to navigate and hover around the current page elements, which will display the font-related information on which the pointer is currently pointed.

Using this tool, not only could I easily perform font-related verifications, but I could also use it to identify the font family to create my own logo and wireframes. This tool is helpful when you just want to get an idea of font-related details such as font family, weight, line height, and color.
I must say that this tool fetches the font related information from the source code. In that case, if a specific font is not installed then it will still give you the information from the source code, which is, depending on your use-case, a drawback.
Url: https://chrome.google.com/webstore/detail/whatfont/jabopobgcpjmedljpbcaablpmlmfcogm?hl=en
CSSViewer
Use Case: Validating everything related to fonts on a web page.

CSSViewer (another Chrome extension) is a simple CSS properties viewer that allows you to click on a button, an image, text, or any other web element on a page and instantly view all the CSS properties associated with that element.
This is one of my favorite browser tools because it provides not only the information that is font-related but also the stylings of any web element that you hover over. It provides you with all the associated CSS styles of a particular element. For example, when you hover over the navigation bar, it will give you all the styling-related information that is associated with the nav bar. Further, when you hover over a button, it will provide you all the CSS styling related to the button.
This saves a lot of time for me whenever I need to look at the styling properties of elements rather than inspect elements with the browser dev tool. For example, let’s say I want to find the stylings of a pseudo-element on a web module. Clicking on that pseudo-element and navigating through the hierarchy of the html code and there onwards finding the corresponding CSS styling is a hassle. But when you have the CSSViewer tool, it’s just a click away. All the information is displayed just right on the screen.
Url: https://chrome.google.com/webstore/detail/cssviewer/ggfgijbpiheegefliciemofobhmofgce?hl=en
PixelZoomer
Use Case: Validating the measurement of any web element
When it comes to UI verifications, the pixels of UI elements are essential as, in most cases, a website's design follows consistency. This has been another essential tool for me to measure the size of web elements. It also helps to measure the pixels of even tiny objects on the screen with its ability to zoom in and let you use the measuring tool around the objects.
PixelZoomer acts as a measuring tool as well as provides other facilities that enhance its core usage. If you see the upper left corner, you will be able to find the associated features of the tool. The select icon lets you click and select any area of the screen to get the X-axis and Y-axis measurement. The move icon will help you move the selection area in case you want to adjust the selection position manually. The magnifying glass icon on the top left corner and the percentage zoom level on the top right corner are the same, letting you zoom in up to 3200%. This ensures the measurement is accurate. You can check the color code using the eyedropper. Also, it provides a zoom level of up to 3200%. The hand icon lets you pan through the screen, the undo and redo icons, as their names suggest, lets you play with the current and previous changes made on the screen. Then comes another handy icon, the eyedropper, that helps you get the color code of any element of the screen. Finally, the image icon on the top right corner would open the screenshot image in a new tab. Note that this screenshot does not include the measurement details, which is a drawback of the tool.
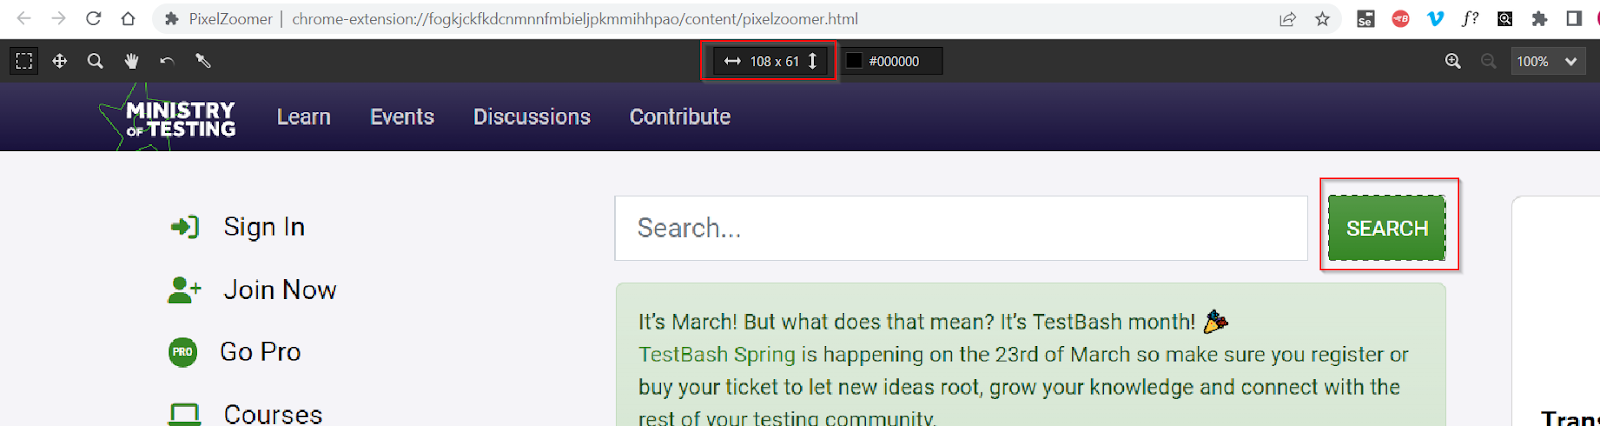
Okay, you might wonder why we wouldn’t use the Perfect Pixel tool itself, as it gives more clarity by giving you the ability to measure against the design mockup. But as we discussed above, there are certain situations where we cannot use the PerfectPixel tool. One situation might be, a project that focuses more on the functionality and the stakeholder needs to only have the look and feel of the web screens consistent but not following any sort of design mockups. Or it can even vary with the main audience of the web solution and how the website or system is going to be interacted with. Sometimes you might even be asked only to check the sizes of the elements and not the whole pixel perfection. In such situations, why should we waste time checking all the elements? We can simply use PixelZoomer for single verifications.
Url: https://chrome.google.com/webstore/detail/pixelzoomer/fogkjckfkdcnmnnfmbieljpkmmihhpao?hl=en
Lightshot
Use Case: Taking screenshot of a web page or an area of the web screen
This is a simple and lightweight tool to get screenshots of a selected area on the screen. You can even share the screenshots via the internet and save them on the cloud. Also, it features an inbuilt editor while using the tool.
Also, as seen above, the PixelZoomer comes up with a handy screenshot icon, but with its drawback of not giving the measurement information on the screenshot. Thus, we can use Lightshot to take quick snapshots of the screens.

This is a useful tool when logging issues, as you can quickly take a screenshot, and before saving, you can edit the screenshot. For instance, if you want to draw attention to a problem area on the screen you can highlight it using this tool. This is one of my go-to tools when I need to insert screenshots into a bug report.
Vimeo

Most of you might know the Vimeo app, which enables you to download videos. Now we have the Vimeo extension, which enables you to record the browser screen with or without audio. You can choose from either full-screen or current-tab video recordings.
When I want to explain an issue while performing an action on the application, this tool is very useful. You can even create video recordings with or without your camera.
Once the recording is done, it generates a video URL that you can load on the browser, or you can even download the recorded video from the download option. Make sure the privacy setting of the video is set up accordingly. If you’re recording a sensitive app, then make sure the privacy setting is made Unlisted (Only people with the link can access) or Private (Only you and people on your account can access).

Conclusion
These are a few of the practical Chrome extensions that, in my opinion, every tester should have in their toolbox. I was able to identify UI-related errors with fonts, colors, margins, paddings, and other elements using the aforementioned tools, such as Pixel Perfect and CSS Viewer. This was really helpful because I was testing websites, which are more UI-focused. Additionally, as mentioned above, the tool CSSViewer gives all styling related to a specific element, saving me the time it would take me to search through the style file. These tools have made my testing simpler, quicker, and more efficient. I believe that these Chrome extensions would be quite helpful given the short deadlines and busy work schedules that we as testers often find ourselves in.