In the realm of automated testing, record and play tools have gained popularity for their ability to simplify the creation of test scripts. These tools allow testers to record their interactions with an application and generate reusable scripts that can be played back to reproduce the same actions.
Record and play tools make it easy for beginners to start with scripted automation, allowing them to build the confidence to transition to writing code and creating more complex test automation scenarios.
Since it seems that every test automation tool, product, or library offers a record and play tool, I was wondering where a powerful automation framework fits into this landscape.
In this article, we will explore the benefits of Playwright as a record and play tool, and discuss its unique advantages in the world of automated testing.
The Rise Of Record And Play Tools
In today’s software market, testing needs to be done rapidly and test results need to be reliable to deliver quality as fast as possible to the customer.
Without a doubt, the most frequently used term in recent years has to be “test automation.” Test automation has emerged as a game-changer, allowing organizations to accelerate their testing efforts, improve efficiency, and enhance overall software quality.
Traditionally, test automation involved extensive coding and scripting, requiring skilled programmers to write and maintain complex test scripts. However, this approach posed challenges, since it limited the involvement of non-technical testers and introduced a steep learning curve for adopting automation practices.
Recognizing these barriers, companies developed record and play tools to enable testers of all backgrounds to contribute to the testing process.
Record and play tools allow testers to interact with an application while the tool records their actions in real time. These interactions encompass various actions, such as clicking buttons, entering data, navigating through screens, and validating results. Once the recording is complete, the tool generates automated test scripts that reproduce the recorded actions, making it easy to repeat the tests with minimal effort.
Advantages Of Record And Playback
One of the key advantages of record and play tools is their simplicity. Testers can create test scripts simply by using the application and performing the desired actions, without the need for in-depth programming knowledge. This approach empowers domain experts and non-technical testers to participate actively in the test automation process, leveraging their expertise to create valuable test scenarios.
Furthermore, record and play tools significantly reduce the time and effort required to create test scripts. Testers no longer need to write code from scratch; instead, they can generate scripts quickly by interacting with the application. This not only boosts productivity but also enables faster test creation and execution cycles, allowing teams to keep up with the rapid pace of software development.
The reusability of recorded test scripts is another notable benefit. Once a test script is created, it can be easily reused across different test runs and environments. This eliminates the need to duplicate effort and ensures consistent testing across various scenarios.
Disadvantages Of Record And Playback
In many cases, testers have to deal with applications where the user interface changes frequently, causing tests that once passed to fail. As a solution the tester often opts for the seemingly straightforward solution of re-recording the tests from scratch.
However, this "just re-recording" approach can quickly become a time-consuming process, eroding testing efficiency. Testers must manually navigate through the application, recreate each step, and revalidate the test results, duplicating efforts and potentially introducing new errors in the process.
Also, as applications become more complex, relying solely on the recorded interactions may not be sufficient to achieve comprehensive test coverage. Testers may encounter scenarios that require additional validations, complex logic, or conditional flows that cannot be captured through simple recording.
Therefore, while record and play tools excel in simplifying test script creation, they should be used in conjunction with other automation techniques to ensure thorough testing.
Do You Know These Tools?
As the demand for faster software releases and agile methodologies increases, record and play tools have gained significant traction in the testing community. Many tool vendors have invested in developing and enhancing these tools, providing advanced features such as support for multiple platforms, integrations with popular testing frameworks, and built-in reporting capabilities.
To get a better picture of how big the market is for record and play tools, I have created a list of some of the most popular tools for record and play:
- Rainforest QA - Uses pixel-matching and preset actions to perform test steps — which means anyone, even a non-developer, can create, edit and run tests.
- Selenium IDE - One of the most well-known tools on this list. Selenium, the predecessor of Webdriver, allows record and playback functionality in Chrome and Firefox via a browser extension.
- TestComplete - TestComplete by SmartBear uses JavaScript, Python, and VBScript. It supports testing on most desktop, web, and mobile platforms (including both iOS and Android).
- Micro Focus UFT - Micro Focus UFT offers a few different methods for creating tests, from writing the code yourself to a record-and-playback option. This was the first record and playback tool I ever used (at that time, it was called Quicktest Professional).
- Katalon Studio - Unlike some record-and-playback tools, Katalon lets developers stop and restart a recording at any point during test creation or execution to insert additional lines of code.
- Cypress Studio - Cypress is one of my favorite solutions to write tests. You can write tests fast, debug them visually, and even record them. For more information on its recording functionality, see one of my previous articles for the Ministry of Testing, Getting Started With The Cypress Recorder.
- Playwright - We will investigate this tool in this article.
Now I know this list does not include all of the tools that provide record and play functionality, and it’s not possible to do that here. I wanted to show that there are a lot of tools, some of which you might be familiar with and some you might not. Write in the comments on this article what you think about the list, or add new tools to the Ministry of Testing tool list.
Playwright: A Quick Introduction
Playwright is a powerful and versatile open-source automation framework developed by Microsoft. Its features and capabilities include, according to the Playwright GitHub repository, the following:
- Cross-browser. Playwright supports all modern rendering engines, including Chromium, Firefox, and WebKit.
- Cross-platform. Test on Windows, Linux, and macOS, locally or on a continuous integration server, headless or headed.
- Cross-language. Use the Playwright API in TypeScript, JavaScript, Python, .NET, or Java.
Playwright's automation capabilities go beyond basic actions like clicking buttons or filling out forms. Some of these advanced features, according to the GitHub documentation, include:
- Trusted events. Hover elements, interact with dynamic controls, produce trusted events. Playwright uses a real browser input pipeline indistinguishable from the real user.
- Test frames, pierce Shadow DOM. Playwright selectors pierce shadow DOM and allow entering frames seamlessly.
- Auto-wait. Playwright waits for elements to be actionable prior to performing actions. It also has a rich set of introspection events. The combination of the two eliminates the need for artificial timeouts - the primary cause of flaky tests.
While Playwright does offer a lot of functionality that would make you want to start using it right away, there are some aspects that you need to consider first.
Because Playwright supports a lot of languages, you might encounter issues in the documentation and features. In my experience, the documentation was extensive for Java and Javascript but was a bit lacking for Python and .NET. Things have improved since then.
Also, depending on the language that you want to use for automation, the steepness of the learning curve may vary, since the syntax for Java differs a lot from what is used for Selenium.
To give you a jumpstart, we will see in the next chapter how to install Playwright and how to get used to its syntax by using its Recorder capabilities.
Playwright In Action
First, we will perform an installation from scratch on a Windows machine.
The only prerequisites for the installation are :
- IDE ( I will use Visual Studio Code )
- Node.js
Installation
Once you have installed the prerequisites, you need to create a new folder on your machine and then open that folder in your IDE.
With the IDE open, type the following command in the terminal \to set up and install Playwright.
npm init playwright@latest
The installation calls for the selection of a few options:
- Choose between TypeScript or JavaScript (default is TypeScript)
- Name of your Tests folder (default is tests or e2e if you already have a tests folder in your project)
- Add a GitHub Actions workflow to run tests easily on a CI server
- Install Playwright browsers (default is true)
Once all the options have been set, the installation will continue.
Getting started with writing end-to-end tests with Playwright:
Initializing project in '.'
√ Do you want to use TypeScript or JavaScript? · TypeScript
√ Where to put your end-to-end tests? · tests
√ Add a GitHub Actions workflow? (y/N) · false
√ Install Playwright browsers (can be done manually via 'npx playwright install')? (Y/n) · true
Initializing NPM project (npm init -y)…
Wrote to D:\PlaywrightMOT\package.json:
Depending on your system the installation process may take a few minutes. After that you should see the following structure in your project
-
.\tests\example.spec.js- Example end-to-end test -
.\tests-examples\demo-todo-app.spec.js- Demo to-do app end-to-end tests -
.\playwright.config.js- Playwright test configuration
Using The Recorder To Prime Test Creation
Now that the installation is complete we will want to record the following test:
- Navigate to https://automationintesting.online/
- Fill in the form
- Submit
To begin recording, enter the following command in the terminal:
npx playwright codegen
This will open two windows:
- The browser window, where you interact with the website you wish to test
- The Playwright Inspector window, where you can record your tests and then copy them into your editor
After you have opened the URL, in our case https://automationintesting.online/, in the browser and started to interact with the page the recorder will automatically update and add code based on the actions taken. One important aspect to be aware of is the fact that all actions will be recorded, so clicking a button multiple times will appear multiple times in the code. But do not worry: you can still edit the code after the recording is done.
After you have performed all the desired steps, you can stop the recording. You will see the generated code in the Inspector.
You will need to copy the code into an editor to save it to a file. To make things easy to follow for this example, I copied the code into example.specs.js.
To make sure that our test is correct we will need to run it. To run the test, execute the command below:
npx playwright test
The above command runs all tests in the tests folder. If you want to run only the tests in one file, pass the filename as an argument to the command. For example:
npx playwright test example.spec.js
By default tests will be run in three browsers: chromium, Firefox, and WebKit, using three separate workers. The browsers in which the test is run by default can be configured in the playwright.config file.
The tests are run in headless mode, meaning no browser windows will be opened when running the tests. Results of the tests and test logs will be shown in the terminal.
To see how our test runs and to debug it we can use the command below to run the test in an open browser window.
npx playwright test --ui
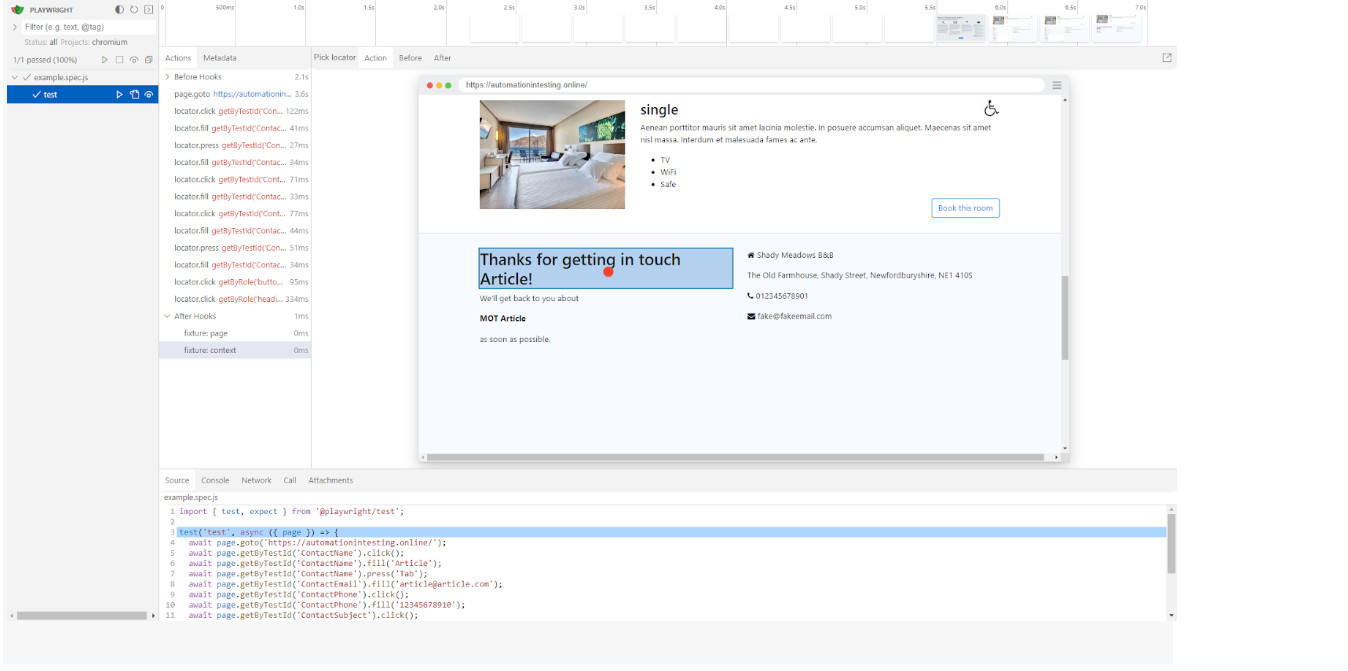
In this mode, we can see all the tests that we have. We can also interact with tests and the application under test on each step via the time travel debugging.

As you might have noticed, the recorder does have one feature missing that, for me, is crucial when doing test automation. And that is assertions.
To make our test complete, we will change the test and add an assertion at the end that checks for the confirmation text. We just need to change the last piece of the test to have an assertion, a check. In Playwright, test assertions are made using the expect function. In our case we will call expect and add the toContainText method.
await page.getByRole(‘buton’, {name: ‘Submit’}).click();
await expect(page.getByRole(‘heading’, {name: ‘Thanks for getting in touch Article!’ })).toContainText(‘Article’);
After you save the file and run the test again, you will see the test being marked as passed.
If you want to make sure that the assertion is correct, you can change the string passed to the toContainText method from “Article” to something else, and run the test again. The test will fail and the logs will show you the exact reason and the part of the test that failed.
Final Thoughts
In a world where test automation is essential for delivering high-quality software, Playwright stands out as a valuable tool for those seeking a modern and efficient approach.
With its cross-browser and cross-platform capabilities, rich feature set, and growing community, Playwright is positioned to continue shaping the future of test automation, helping teams achieve their testing goals effectively and efficiently.
For Further Information
- The Joy Of Record And Playback In Test Automation, by Louise Gibbs
- Hello, Cypress! by Kate Nesmyelova


