Six common mistakes in test automation scripting
Avoid these mistakes to build automation that survives UI changes, validates outcomes properly, and provides useful feedback.

Even though we are diving into a world where AI has already started transforming how automation scripting is created. It has not yet taken the unique place that test automation holds in the software testing industry. There may be AI-driven platforms and tools to enhance the test automation practices. But test automation still follows its own procedures, structures, and better practices to achieve a satisfying final result.
One thing I noticed while mentoring and monitoring the fellow test engineers is that they keep making some frequent, yet concerning mistakes. These are the mistakes that may occur from junior to senior-level testers. Even though the density of mistakes that occur seems simple, their impact can threaten the quality of the system under test (SUT). This article focuses on some of the very common mistakes we make when writing automated test scripts, which can be easily avoided with best practices.
Copying and pasting the locator XPath/CSS Path derived from the browser dev inspection tool
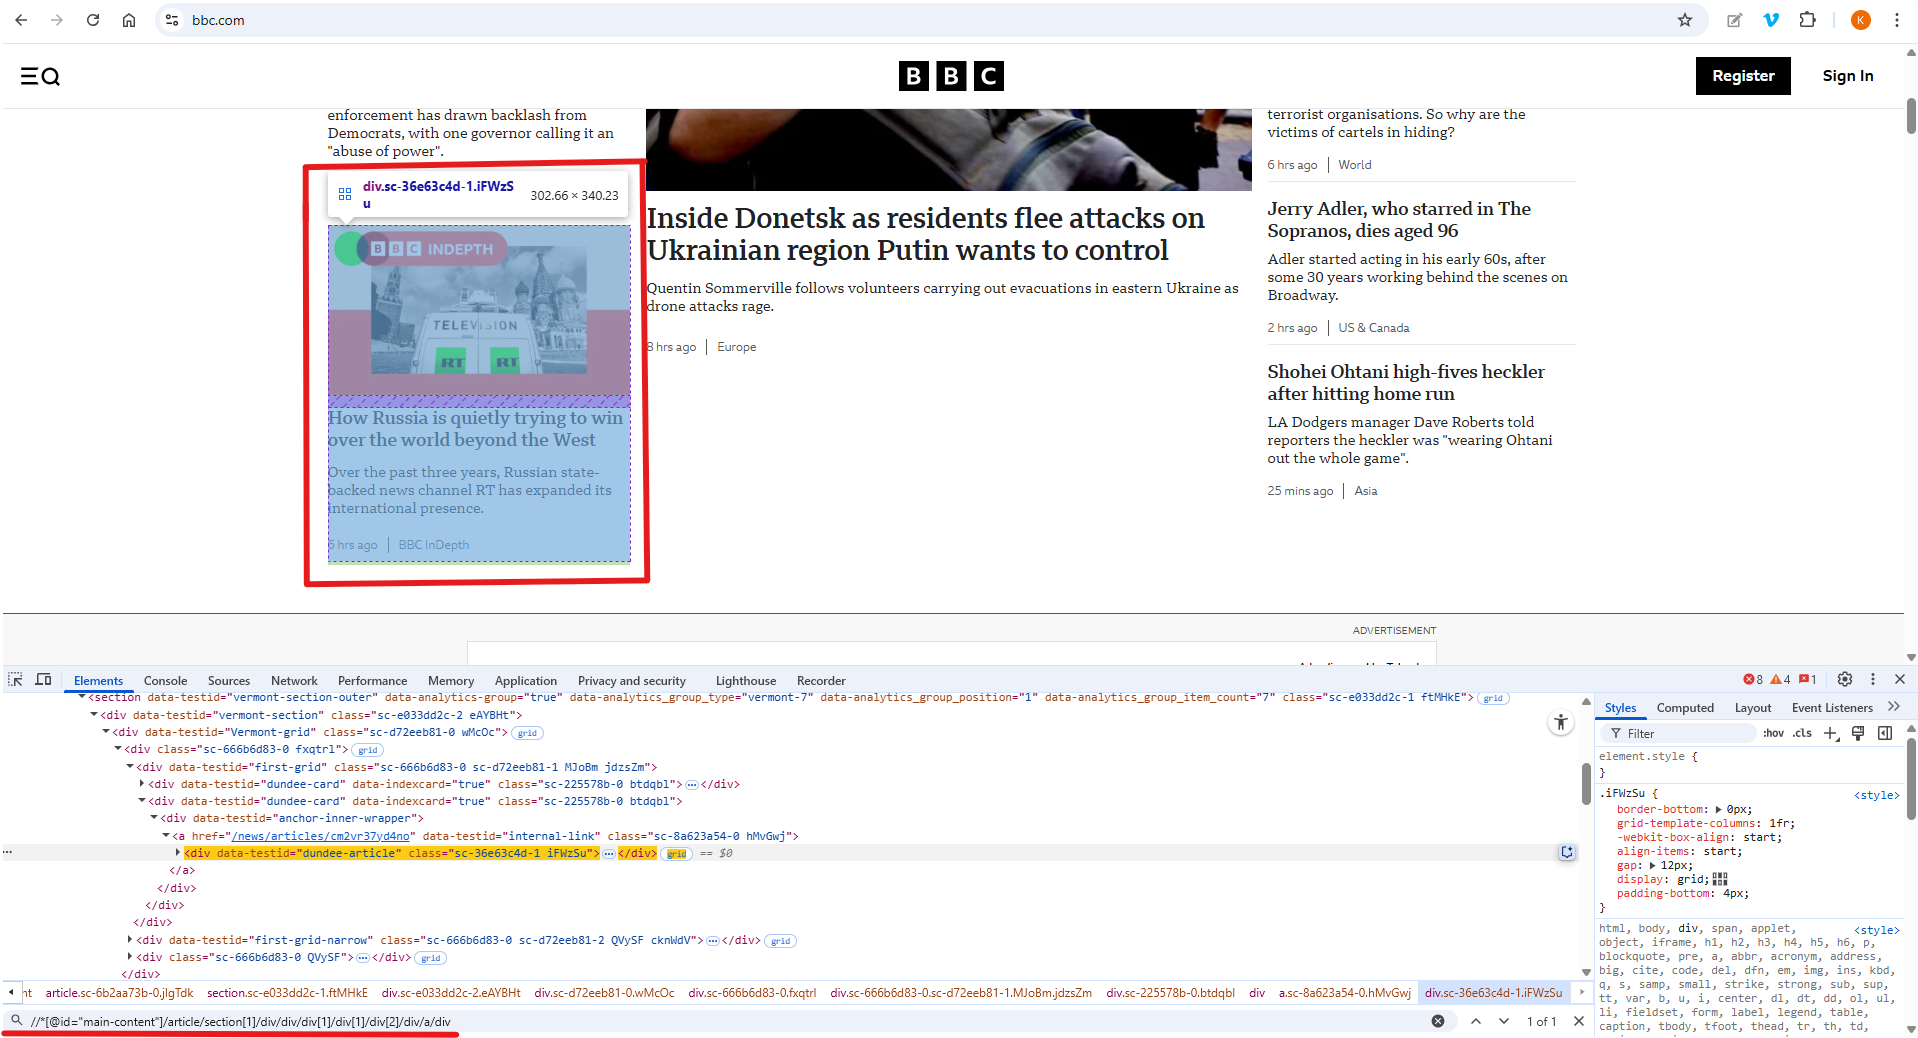
Web elements such as text, buttons, and links are the building blocks of web pages. Locators are their addresses and critical, as they serve as a primary requirement for ensuring accurate test automation. Using locators, something to identify an element on a web page, a script can trigger actions, such as clicking a button or typing in a text field. Therefore, it is essential to capture unique locators to ensure that the test cases pass under various conditions. However, when you capture locators directly from the developer tools, they often return the element's absolute path.
The absolute XPath typically starts at the site’s root node and includes all parent and child elements along the path to the target element's root. Think of it like a full postal address for an element on a web page. It starts at the top of the site and lists every “street” and “house” (every HTML tag) until it gets to the exact item.
For example, the absolute XPath of the specific highlighted card might look like one of these:
//*[@id="main-content"]/article/section[1]/div/div/div[1]/div[1]/div[2]/div/a/div
/html/body/main/section/div/a
XPath (XML Path) uses a unique syntax to navigate the HTML document tree, allowing users to locate web elements.
Imagine a scenario where a slight change is made to the element’s hierarchical structure, such as removing child nodes or adding new nodes in between. In such a case, the script will fail to locate the element correctly, even though the card remains visible in the user interface (UI).
Solution: Write unique, easy-to-maintain, and robust XPath adhering to the following rules:
- Use a relative path that is constructed from a stable point in the DOM (Document Object Model) rather than starting from the root. A DOM is the structured representation of a web page that allows interaction using the JavaScript programming language.
- Use unique attributes such as ID and name, as these attributes are less likely to change. You can employ contains(), starts-with(), or ends-with() for dynamic attributes.
- Using text() for text-based elements.
- Use XPath Axes for relational locators such as parent, child, following-sibling, preceding-sibling, etc.
- Avoid using indexes in the paths, such as //div[1], as this can easily change with DOM structural modifications.
For the above, we can write the unique XPath to capture all the news cards as below:
//div[@data-testid="dundee-card"]
Hard-coded verification approach instead of Dynamic verification using loops (Data-Driven or Iterative Testing)
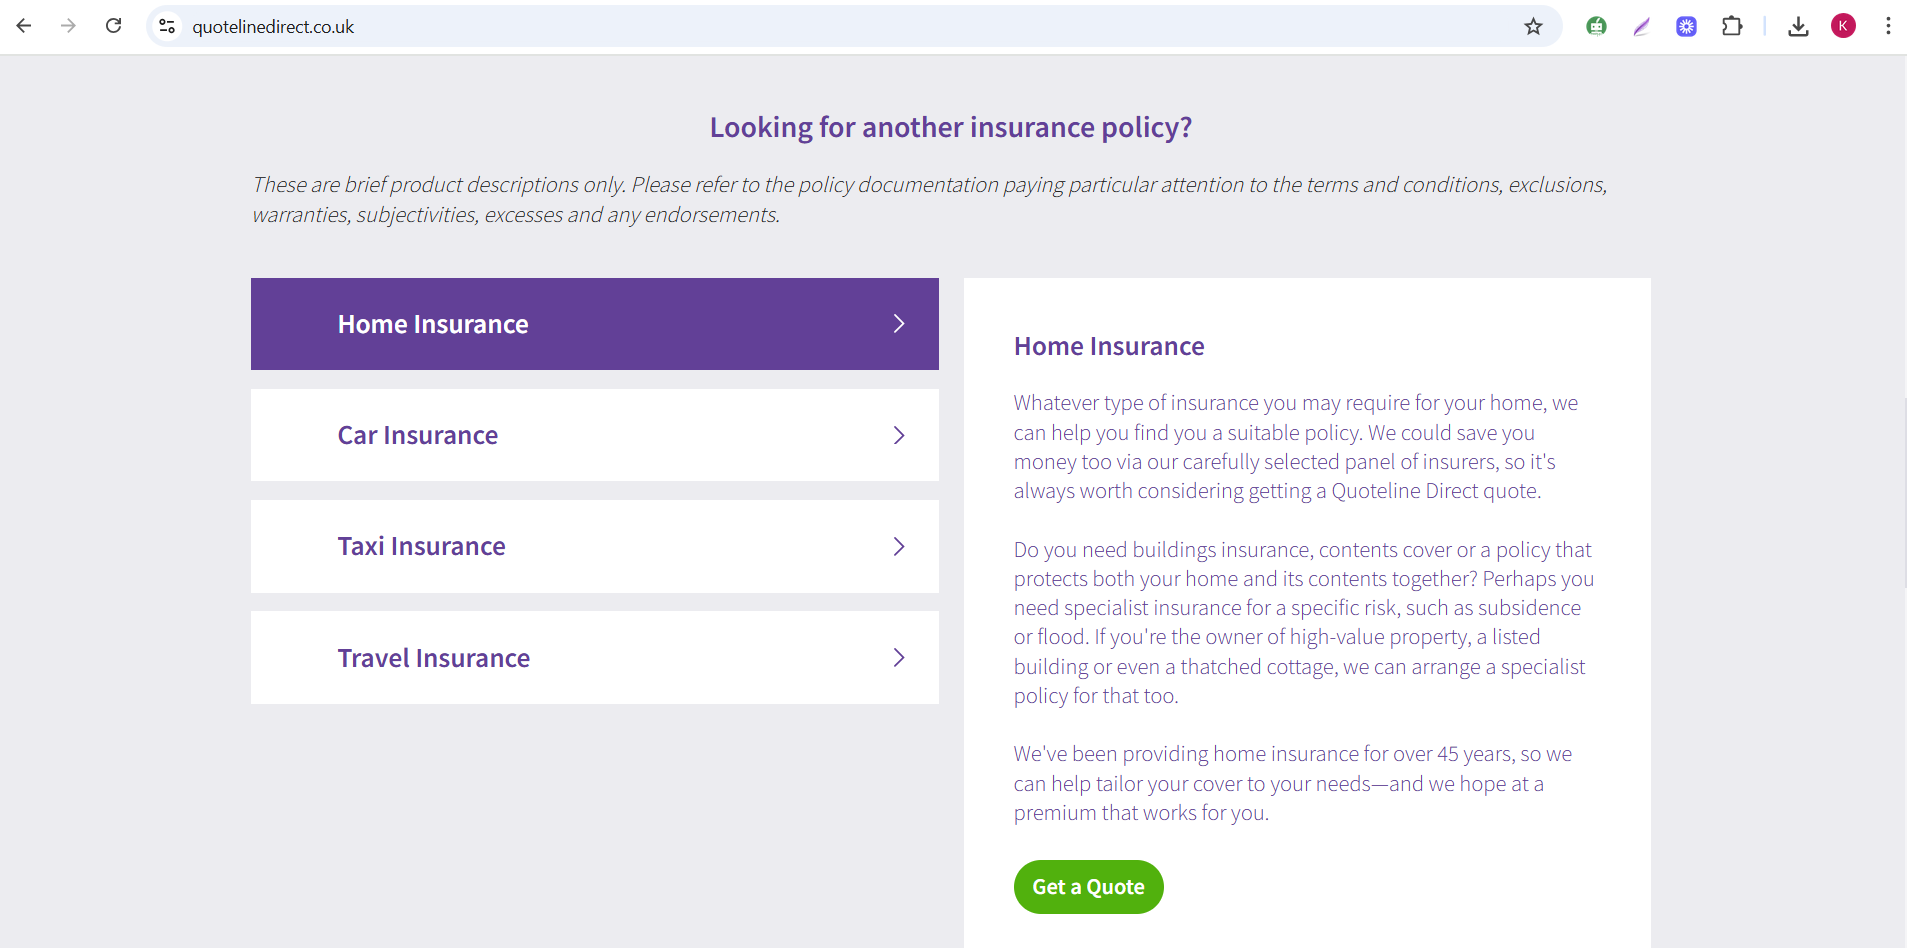
Consider the accordion shown below, which currently contains only four items. If the automation script is hardcoded to iterate through all the accordions on the page. Then, later, the client adds more items to the accordion section, the tester will need to modify the script to account for the newly added items by updating the module or action.
Additionally, if the site contains multiple pages with similar accordions but different content, then the user may end up writing multiple modules with hardcoded values. This approach leads to significant rework and inefficiency.
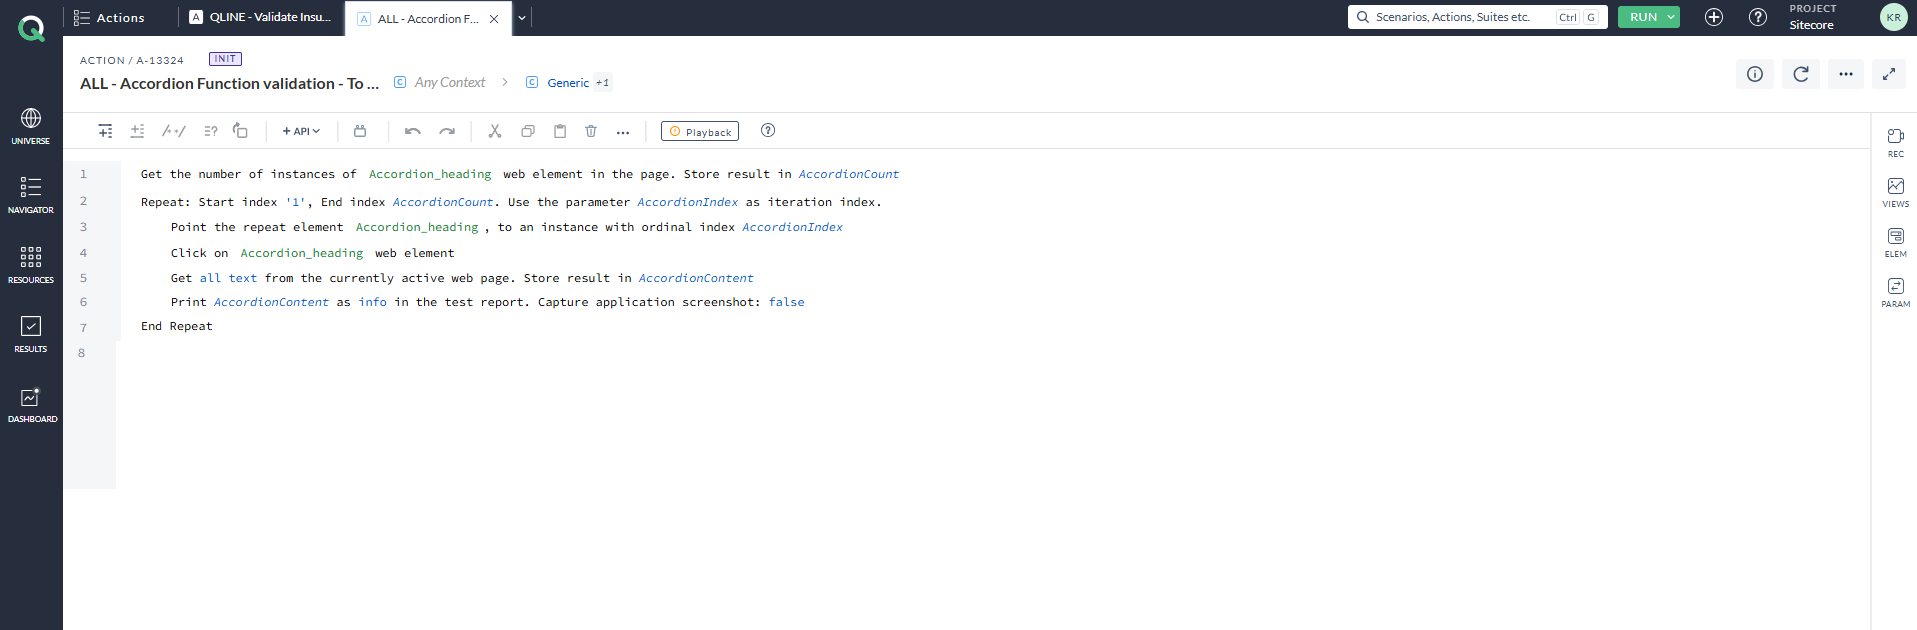
Solution: To address this challenge, the best practice in test automation is to use loops to iterate over the number of items and perform validations. A loop is simply a method to use code multiple times or until a condition is met. By implementing loops, you first determine the count of the items and then iterate through them. This approach effectively resolves the issue mentioned above.
As a result, regardless of how many items are added in the accordion section, the script will not fail or leave any items unverified. The screenshot below shows the AccelQ action that loops through the accordion mentioned above. The statement below uses a Repeat statement, one of the loop statements available in the AccelQ tool. The accordion item is captured and stored as the locator Accordion_heading. The first line of the statement retrieves and stores the count of accordion items on the web page in a variable named AccordionCount. The Repeat statement is used to iterate through the accordion items. (Note: AccelQ is an AI-integrated, Selenium-based automation tool.)
Failing to perform validations for the outcomes of actions
Failing to perform validations leads to tests passing even when the validation fails, because it only focuses on the logic.
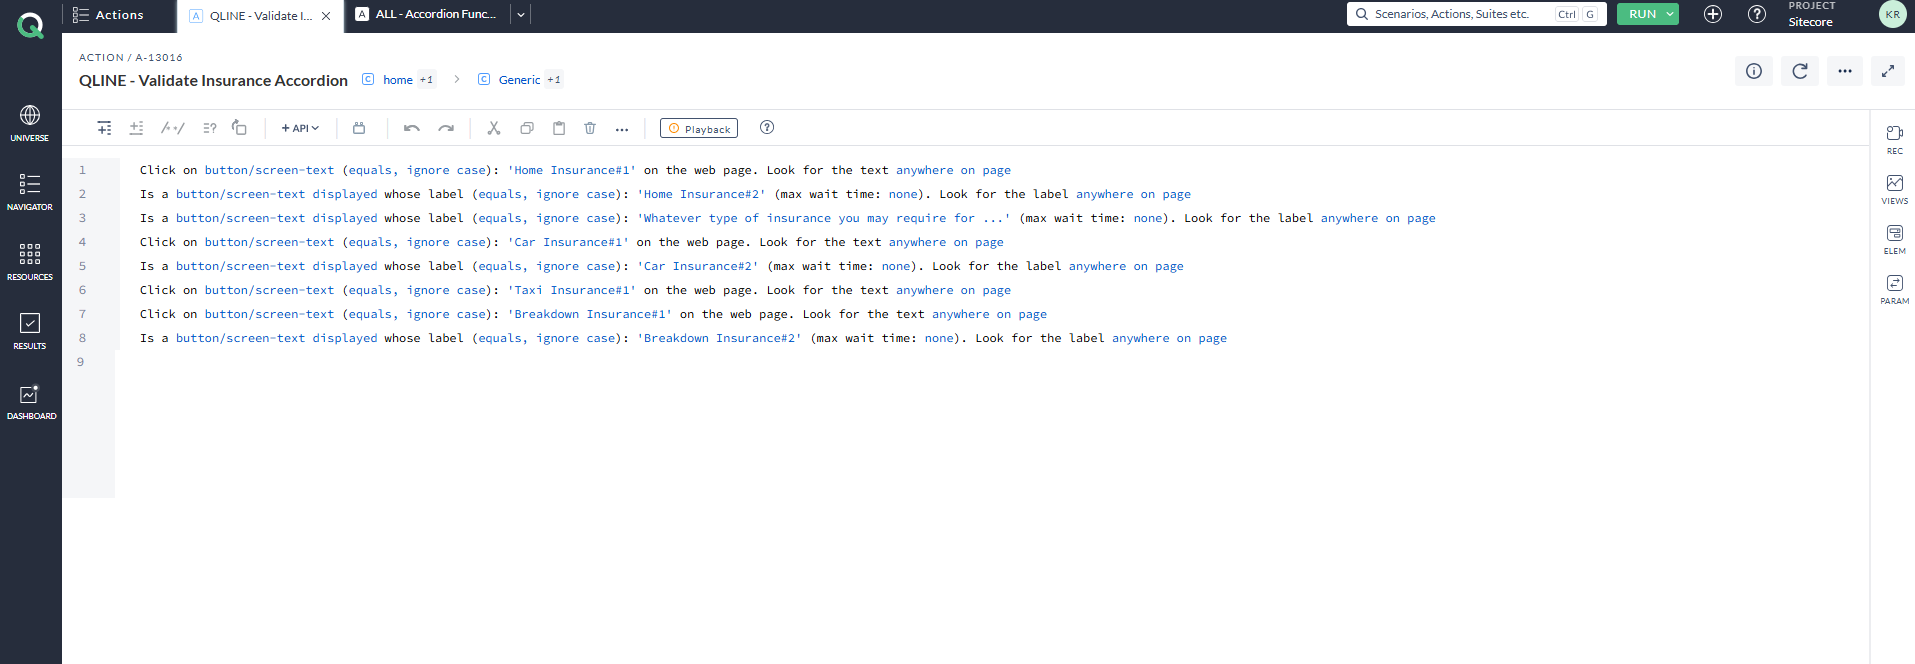
Let’s revisit the same accordion mentioned earlier. If you examine the loop statement, you will notice that it only performs actions such as clicking each accordion and retrieving its title. While the script executes the accordion action, it does not include any verification to ensure that the correct content is being loaded for the corresponding accordion.
To address this issue, testers must include steps to verify content. Validation is crucial because even if the action executes without errors, there is no guarantee that it was performed on the correct section or that the correct content was displayed. In such cases, even if the test technically passes, it is still considered a failure if the content does not match the expected outcome. To prevent this, verification steps should be incorporated within the loops or wherever they are applicable in the test script.
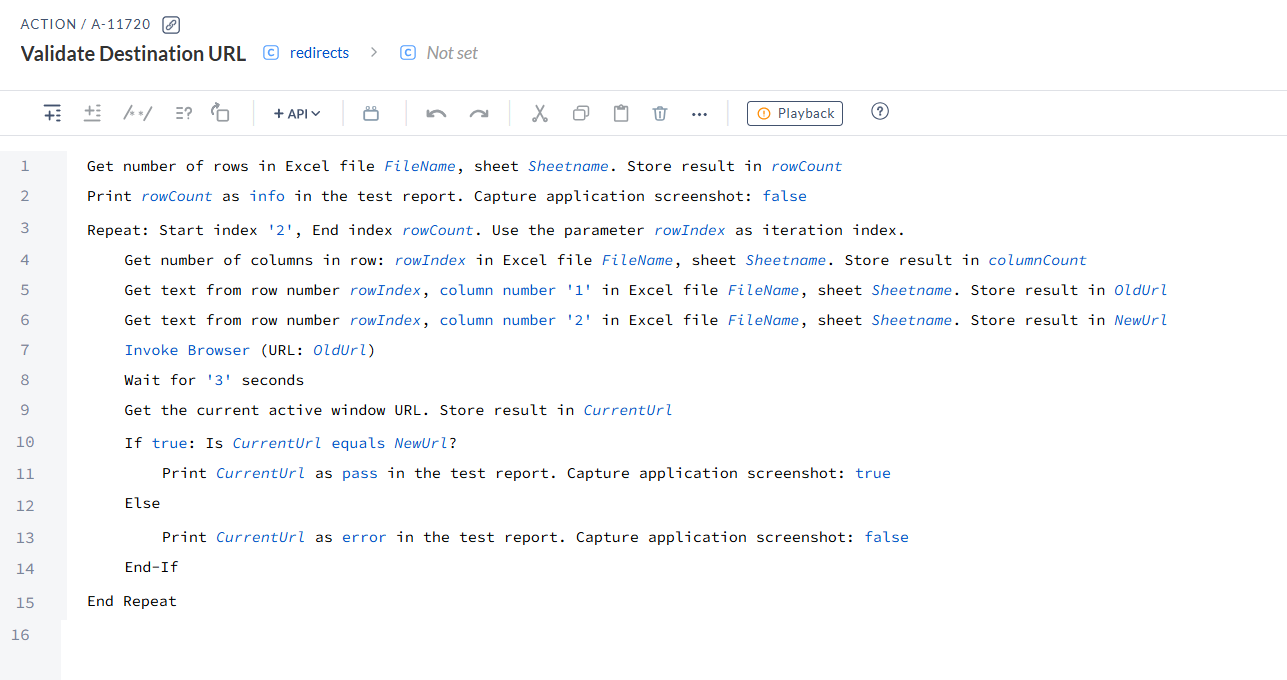
Let’s take another simple example: redirects to another page. How can you mark the test case as passed simply by clicking on the link text, without verifying whether it has been redirected to the correct page and URL?
The screenshot below shows an AccelQ script for validating page redirection. The list of URLs is sent in a CSV file, configured for use on the first line. The CSV file consists of two columns. The first column is the old URL, and the second column contains the new URL (expected redirecting URL). The number of rows is stored inside a variable (rowCount). The full list of URLs is loaded in the browser one by one using a loop iteration, as displayed. Once the URL is loaded, the current browser URL is taken and stored inside a variable named CurrentURL. Now comes the validation part inside the if-else condition. The condition checks whether the CurrentURL matches the URL in the second column of the CSV file, stored in the variable NewUrl. If it matches, it prints the current URL with a pass status; otherwise, it prints a fail message with the current URL.
Hardcoding test data instead of a data-driven test approach
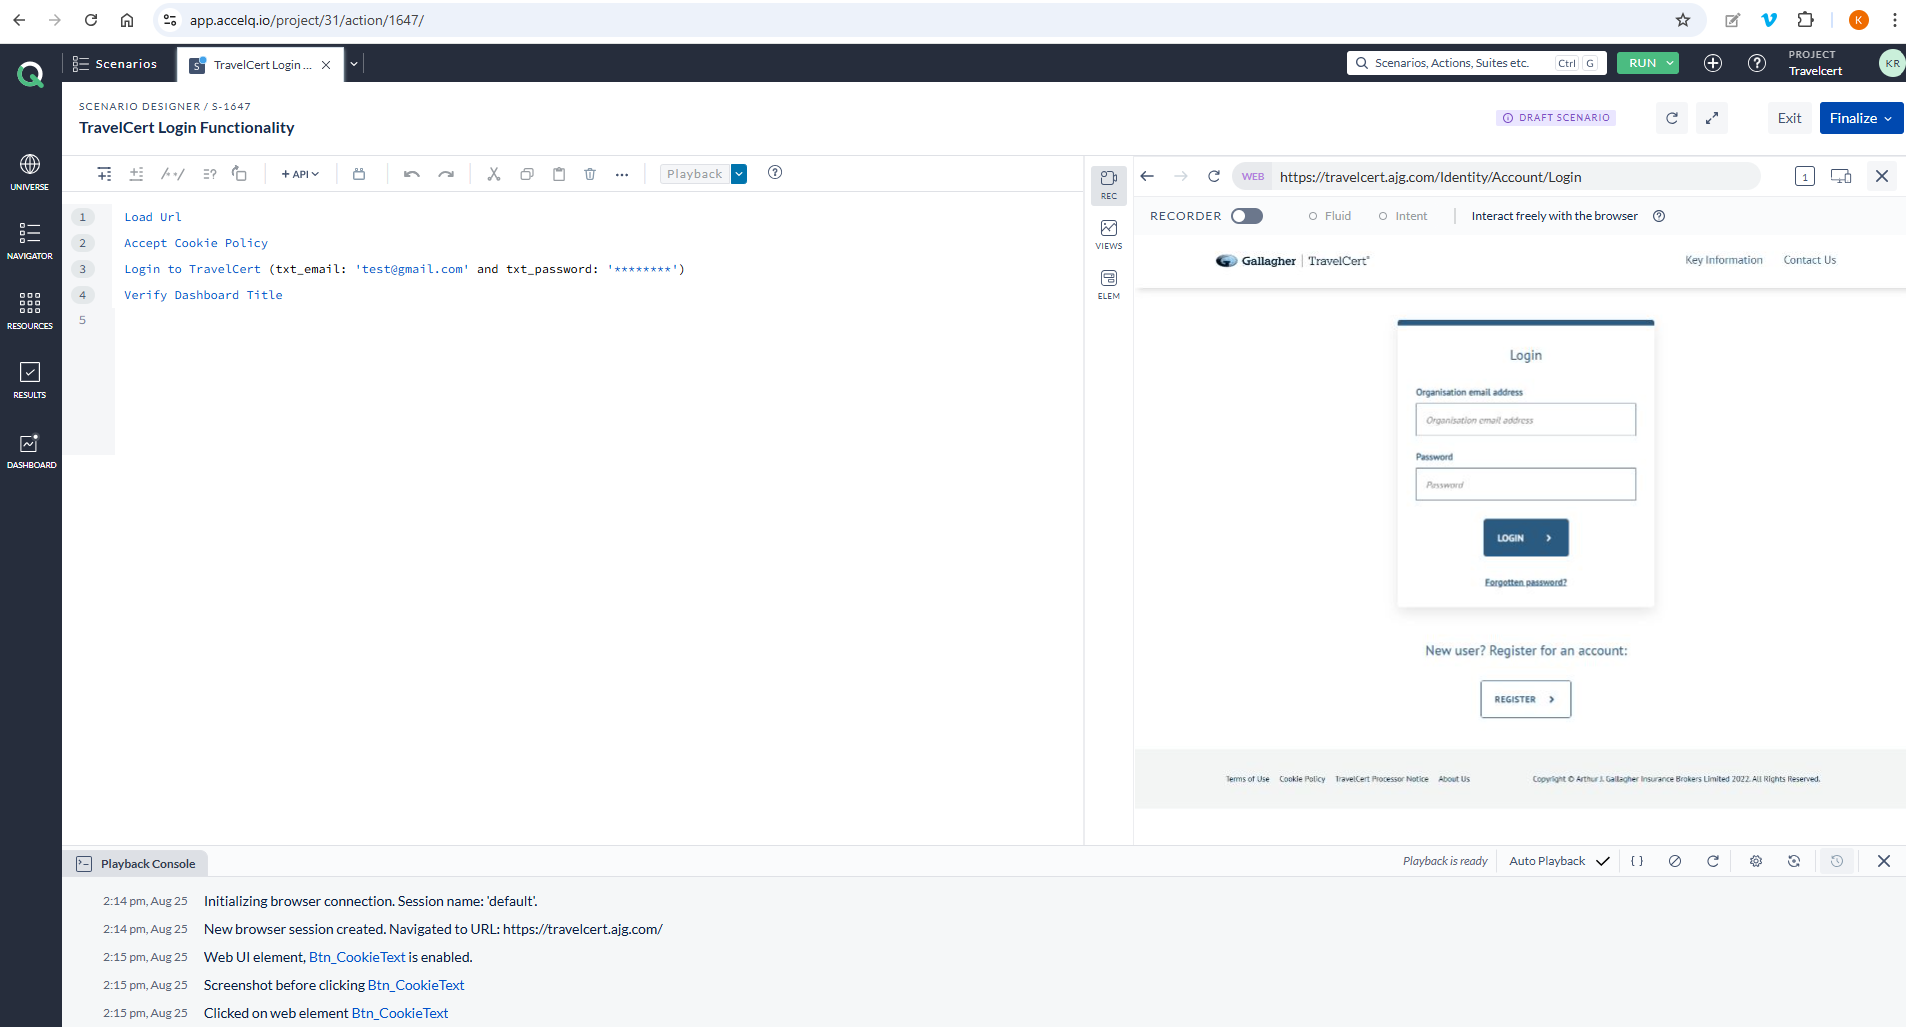
When working with modules that require inputting data, the fields are typically parameterised. For instance, let’s take a simple Login page. The email and password input fields are always parameterised to allow input data to be passed into the test case during execution.
However, this test case requires more than a single data set to account for both positive and negative scenarios. To achieve this, a combination of test data is necessary. If the test data values are hardcoded, the test can only be run once. Each time different cases need to be tested, the test data must be manually updated in the test case, which will lead to inefficiency and additional effort.
Solution: To overcome this hassle, it is always recommended to push the data via a data sheet, such as a CSV or XML file. This approach makes your life easier, as you don’t need to manually change the test data for each execution. Instead, you simply add more data to the data sheet. The execution will then run iteratively based on the amount of data present in the sheet.
This method is not limited to input data alone. It can also be used to drive any action that requires variable values. For example, even XPath attribute values can also be included in the data sheet.
Consider the case of button text. If there are actions to click on buttons across the site, each with a different button name, the XPath expression using text()=”<button_name>” would vary. In this case, you can create a column in the data sheet for button names and input appropriate values for each button found on the site. For example, the data sheet for the button name can look like below:
| button_name |
| Submit |
| Read more |
| Search |
Not setting screenshot capture configuration at verification points
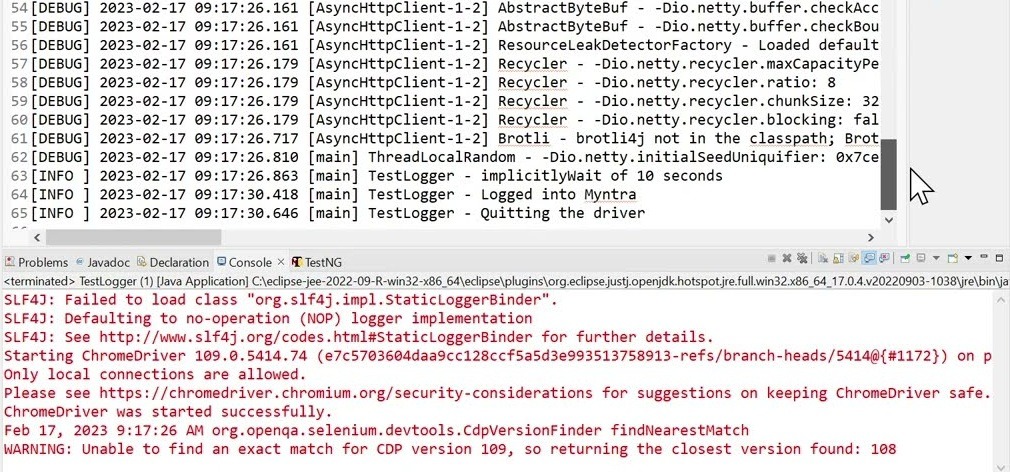
A test suite can contain hundreds of test cases, and failures can occur for various reasons across different areas. While error logs are generated in the test result report, identifying the root cause of a failure can sometimes be time-consuming when relying solely on log analysis. For example, consider the error log below from an automation script execution console. It is always a bit difficult and time-consuming to understand the error log, and a tester cannot pinpoint the failure at a glance.
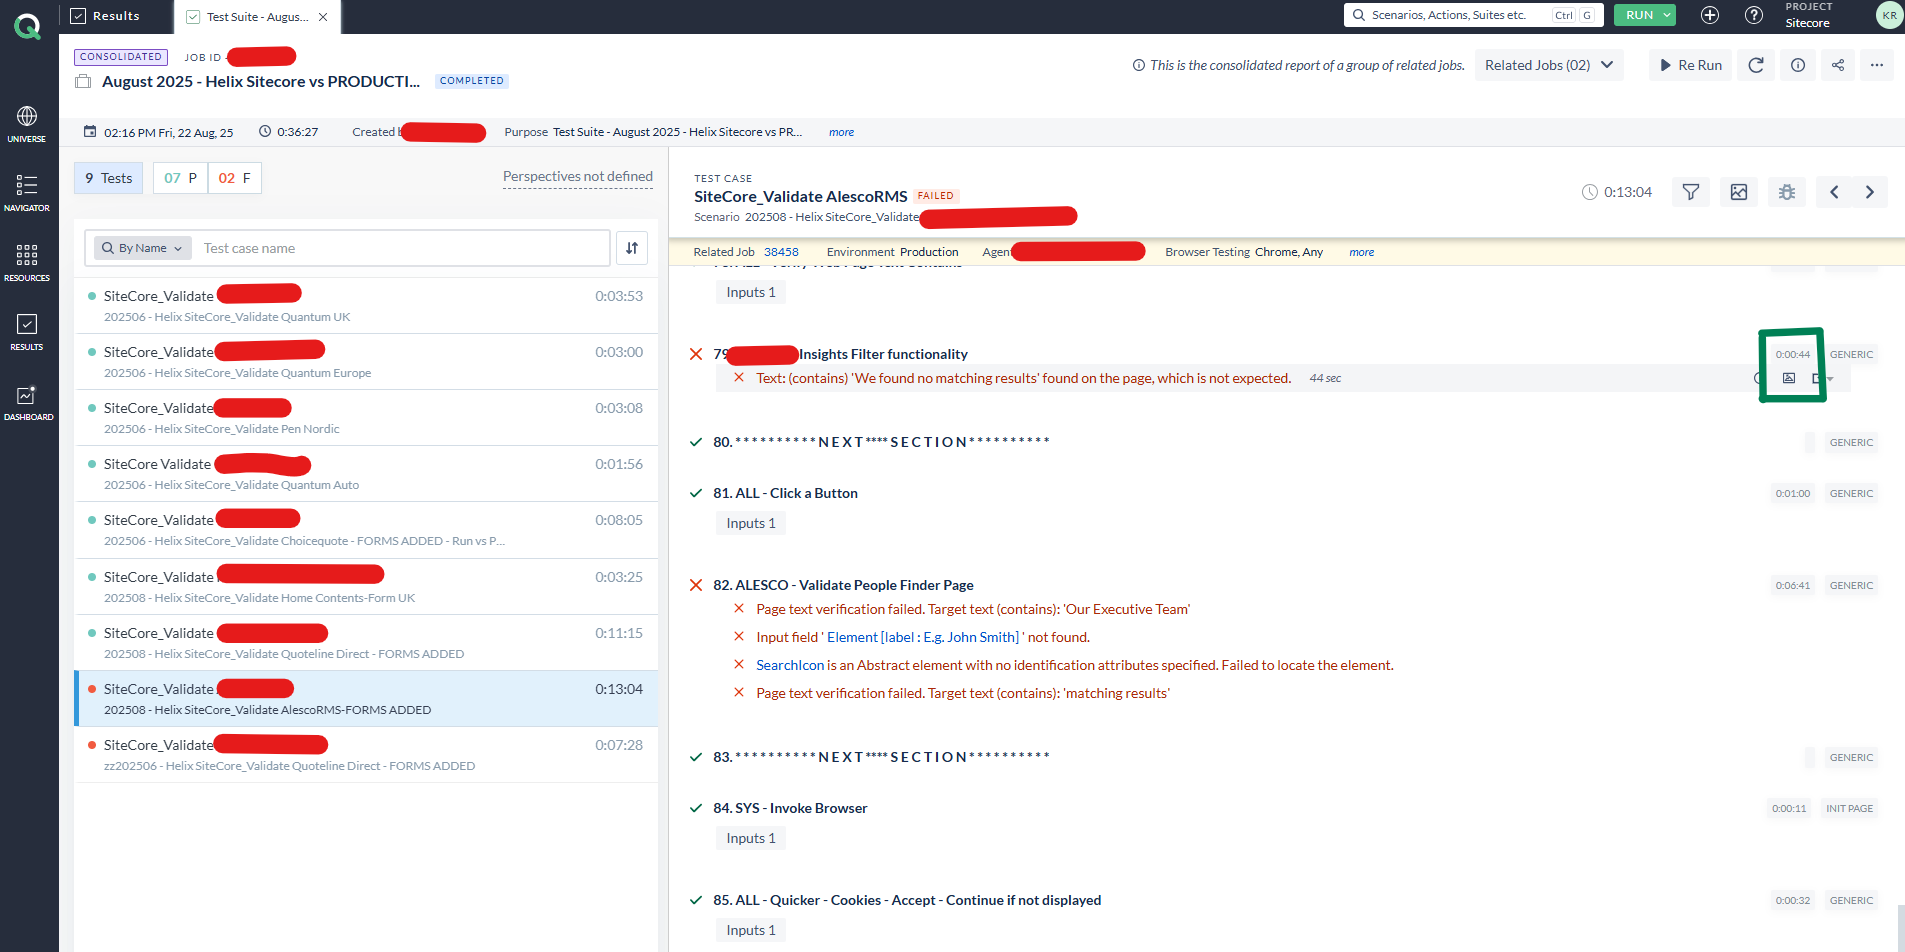
Solution: Having a clear visual on the failed step makes a tester’s job easier, helping to quickly determine whether the failure is due to a code issue or an actual bug. Some tools offer built-in features that automatically capture a screenshot whenever a failure happens.
For example, the screenshot below shows a test result report generated by the AccelQ automation tool, which also has a built-in feature to capture a screenshot at each failed step. If you are using Selenium Java, you can implement a listener that automatically captures a screenshot whenever a test fails. Since Selenium uses TestNG, you will need to configure it to use the Listener.
Insufficient error handling
During automated test executions, you may encounter errors such as NoSuchElementException, TimeoutException, WebDriverException, and others. These typically occur due to poor or insufficient error handling in the scripts. These exceptions can cause the script to crash and halt execution immediately. This makes life harder for testers and developers alike, as it increases debugging time and thus leads to unreliable test automation.
Solution: These issues can be prevented by implementing proper error handling wherever applicable. A commonly used approach is to use try-catch blocks or similar constructs to manage the potential exceptions. Enclose the code that might throw an exception within the try block and then catch the specific exception inside the catch block, as displayed below.
try {

    // Code that might throw a Selenium-related exception (e.g., finding an element)

    WebElement element = driver.findElement(By.id("someId"));

    element.click();

} catch (NoSuchElementException e) {

    // Handle the specific NoSuchElementException

    System.out.println("Element not found: " + e.getMessage());

    // Optionally, take a screenshot or log the error

} catch (TimeoutException e) {

    // Handle the specific TimeoutException

    System.out.println("Timeout occurred: " + e.getMessage());

} catch (Exception e) {

    // Catch any other unexpected exceptions

    System.out.println("An unexpected error occurred: " + e.getMessage());

} finally {

    // Optional: Code in this block will always execute, regardless of whether an exception occurred

    // Useful for cleanup, like closing the browser

    // driver.quit();

}
To sum up
Mistakes are common in test automations, but the ones mentioned above can be avoided by developing good habits and best practices. The more consistently we avoid these mistakes, the better and more efficient the automation scripts will become. Now you are aware of some of the very common mistakes we make when writing automated test scripts, you can make sure to avoid them, or help others if you see them.
What do YOU think?
Got comments or thoughts? Share them in the comments box below. If you like, use the ideas below as starting points for reflection and discussion.
- Have you seen or made similar mistakes while writing test automation scripts?
- How were they solved?
- What did you learn?
- Were there any severe impacts to the projects due to the automation script mistakes you made?
For more information

A software QA professional with around 7+ years of experience in both manual and automation testing. A keen student to learn new technologies and trends, and a passionate educator.
Comments